Using AWS Rekognition in CFML: Detecting Text in an Image
Posted 20 August 2018
Text detection in an image or video stream is a really interesting — and useful — use case for Rekognition. You could use it for near real-time AR (snap a picture and detect landmarks or street signs, provide a video stream and do the same) or indexing slide text in a series of conference presentations. You could use it to “scan” business cards, receipts, or all sorts of documentation. It could be used to perform OCR (optical character recognition) on that backlog of thousands of PDFs which are just scans of documents created by your office copier.
Text detection is one of the newer features in Rekognition, but one without the same potential level of bias that other Rekognition features might be subject to. It’s also, like other Rekognition features, super easy to use.
Following the usual “make a request object, get a result object back” pattern in the AWS Java SDK, here’s an outline of how you perform text detection in Rekognition:
- Get a copy of the Rekognition client we created in the first part of this series.
- Create a “DetectTextRequest” object.
- Create an “Image” object in the Rekognition service to work with.
- Create a “S3Object” object that specifies the path to the image on S3 that you want to treat as the image for the Image object created in step 3.
- Set the S3Object into the Image object.
- Set the Image object into the DetectTextRequest.
- Run the DetectTextRequest.
- Get back a DetectTextResult object.
The Code to Detect Text in an Image
Here’s how we do this in the AWSPlaybox app:
If you haven’t already read the entry on the basic setup needed to access AWS from CFML, please do so now.
As in the example of performing sentiment analysis on the people in an image, we’re going to start the process in /rekognition.cfm by providing a list of paths to images already in S3 from which we can randomly choose:
<cfset s3images.imagesWithText = [ "images/rekogTextTest1.png","images/rekogTestTest2.png" ] />As before, this is just an array of paths to files on S3, nothing more. The files need to already be on S3. The code in the AWSPlaybox app does not upload them for you.
Later in /rekognition.cfm, we randomly select one of those images from the array and run detectText() on that image. We pass in the name of the S3 bucket where the images can be found, and the string value of the path to the randomly selected image.
case 'detectText':
  sourceImage = s3images.imagesWithText[randRange(1, arrayLen(s3images.imagesWithText))];
  detectTextResult = rekognitionLib.detectText(s3images.awsBucketName, sourceImage);
Now we hop over to rekognitionLib.cfc, where the real work happens. If you read through detectText(), you’ll see the eight steps listed above translated into code:
// 1. Get a copy of the Rekognition client
variables.rekognitionService = application.awsServiceFactory.createServiceObject('rekognition');
// 2. Create a "DetectTextRequest" object.
var detectTextRequest = CreateObject('java', 'com.amazonaws.services.rekognition.model.DetectTextRequest').init();
// 3. Create an "Image" object in the Rekognition service to work with.
var imageToScan = CreateObject('java', 'com.amazonaws.services.rekognition.model.Image').init();
// 4. Create a "S3Object" object that specifies the path to the image on S3 that you want to pass into the Image object.
var imageS3Object = CreateObject('java', 'com.amazonaws.services.rekognition.model.S3Object').init();
imageS3Object.setBucket(arguments.awsBucketName);
imageS3Object.setName(arguments.pathToImage);
// 5. Set the S3Object into the Image object.
imageToScan.setS3Object(imageS3Object);
// 6. Set the Image object into the DetectLabelsRequest.
detectTextRequest.setImage(imageToScan);
// 7. Run the DetectTextRequest, and 8. Get back a detectTextResult object.
var detectTextResult = variables.rekognitionService.detectText(detectTextRequest);
Processing the Results of the Detect Text Function
The detectText function in Rekognition returns an array of text detection objects of the type com.amazonaws.services.rekognition.model.TextDetection. Unlike other result objects we’ve seen when working with Rekognition, each TextDetection object contains a key property, Type, which distinguishes that object as one of two kinds of text detection: words and lines.
Rekognition’s text detection performs two detections in one call: one for each “line” of text in the image, and another for each individual word detected in the image, regardless of position. Lines are sequences of words in close physical proximity to one another in an image. Lines start in the upper-left corner of the image and are scanned across to the right and then down over the image, just as you would read a page of text in Western languages. (If you’re looking for bias in Rekognition’s text detection, there it is.)
Line objects have four key properties: the label (or text in the line), the confidence value for that text, the numeric ID value for that line, and the bounding box (in pixels) of that line.
Word objects have five key properties: the label (or text of that word), the confidence value for that word, the numeric ID value for that word, the bounding box (in pixels) of that word, and the parent ID of the line in which the word is contained. Lines have no parent ID; words do. You can use the parent ID of a word to determine what line the word appears in.
In order to process the TextDetection array, we loop over each TextDetection object. I then determine if it’s a line or word that’s being returned by the object, and process each in a slightly different way:
var detectionsArray = detectTextResult.getTextDetections();

var linesCounter = 0;
var wordsCounter = 0;
returnStruct.lines = arrayNew(1);
returnStruct.words = arrayNew(1);

detectionsArray.each(function(thisDetectionObj, index) {
  if (thisDetectionObj.getType() is "LINE") {
    linesCounter++;
    returnStruct.lines[linesCounter] = structNew();
    returnStruct.lines[linesCounter]['label'] = thisDetectionObj.getDetectedText();
    returnStruct.lines[linesCounter]['confidence'] = Int(thisDetectionObj.getConfidence());
    returnStruct.lines[linesCounter]['id'] = thisDetectionObj.getID();
    returnStruct.lines[linesCounter]['geometry'] = thisDetectionObj.getGeometry().toString();
  } else { // getType is "WORD"
    wordsCounter++;
    returnStruct.words[wordsCounter] = structNew();
    returnStruct.words[wordsCounter]['label'] = thisDetectionObj.getDetectedText();
    returnStruct.words[wordsCounter]['confidence'] = Int(thisDetectionObj.getConfidence());
    returnStruct.words[wordsCounter]['id'] = thisDetectionObj.getID();
    returnStruct.words[wordsCounter]['parentID'] = thisDetectionObj.getParentID();
    returnStruct.words[wordsCounter]['geometry'] = thisDetectionObj.getGeometry().toString();
  }
});
This way, I end up with two structures: one for the lines of text in the image, and one for each individual word in the image. There’s value in using either the full line approach or using individual words, so I wanted to be able to provide both to the caller.
Displaying the Results
Back on /rekognition.cfm, we display the source image alongside the result of the text detection:
<cfcase value="detectText">
<cfoutput>
<div>
<div style="width:50%; float:left;">
<p>Here is the image used:</p>
<p>
<img src="http://#s3images.awsBucketName#.s3.amazonaws.com/#sourceImage#" width="450" height="350" border="1" />
</p>
</div>
<div style="width:50%; float:right;">
<p>Lines of text:</p>
<cfloop array="#detectTextResult.lines#" index="idxThisLine">
#idxThisLine.id# | #idxThisLine.label# | (#idxThisLine.confidence#%)<br/>
</cfloop>
<p>Individual words:</p>
<cfloop array="#detectTextResult.words#" index="idxThisWord">
Line: #idxThisWord.parentID# — #idxThisWord.label# (#idxThisWord.confidence#%)<br/>
</cfloop>
</div>
</div>
<br clear="all">
</cfoutput>
</cfcase>Here’s an example result:
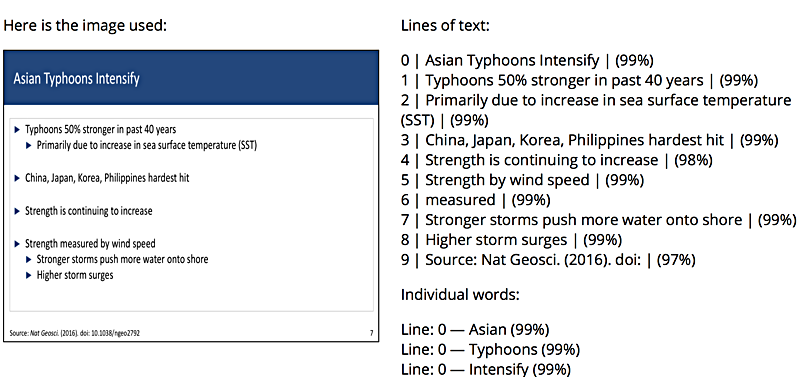
As you can see, the results were very good on a presentation slide with good amount of text. The lines were all correctly detected, although Rekognition decided that the word “measured” in the middle of the last bullet point was on its own line for some odd reason. That’s one bit of wonkiness I’ve seen when working with text detection in Rekognition: the service will, occasionally, put a word or couple of words that are clearly in the middle of a line on a line of their own. I expect that as the training model that powers the service matures, we’ll see less of these mistakes.
Here’s another, more complex, example:
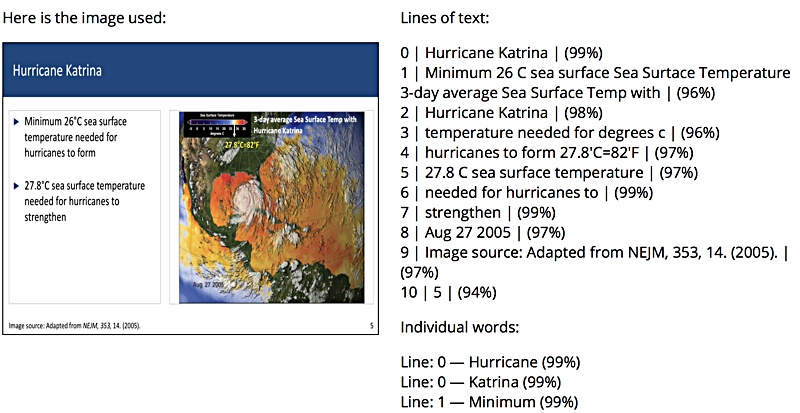
Here we have text alongside an image with text (and a graph) embedded in the source image. Rekognition was, again, very good at detecting the individual words in the image, even when the text was on top of the image of a hurricane and used low contrast color with the image beneath (see how it picked up “Aug 27 2005” even though the contrast between the text and the map beneath is fairly poor).
If you look at the order of the lines in the result set, things may look out of order at first. Line 1 reads “Minimum 26 C sea surface Sea Surtace Temperature 3-day average Sea Surface Temp with”. What’s going on here?
Remember that Rekognition starts in the upper-left corner of the image and reads across, and then progressively down the image. As such, the text in the first bullet point (“Minimum 26 C sea surface”), the very small text just above the temperature graph (“Sea Surtace Temperature”), and the header text on the image (“3-day average Sea Surface Temp with”) are all on the same line. Maybe over time Rekognition will become smart enough to differentiate text on different color backgrounds or using different fonts but on the same horizontal line as different groupings of text, but for now, it sees everything as being on one line.
Line 2 is simply “Hurricane Katrina”. That’s because that line of header text for the image is slightly above the next line of text in the first bullet on the left (“temperature needed for”). “Temperature needed for” and “degrees C” (which can be found just below the temperature graph) are seen by Rekognition as being on the same horizontal line, so they appear in a single line of text (line 3).
While Rekognition is very good at detecting individual words, it still lacks a basic understanding of context — both semantically and positionally. Perhaps AWS will leverage some of their work on Alexa to ultimately be able to derive better semantic understanding of text in images to properly separate lines of text in images like this. In the meantime, the service does really well with full line detection when lines are clearly separated.
That’s it for my tour of using Rekognition from within CFML. If you have any questions about any of the posts in this series, feel free to message me on the Twitter!